
An online personal brand recipe book: Hosting and creating a WordPress site

Your personal blog or website is usually the cornerstone of your online personal brand. It tends to be one of the first pages that comes up when I Google your name and the place I go to find out how you present yourself to the world.
In this recipe, we will combine ingredients to get you a functioning website and blog. Just as there are many ways to create lasagna, so are there many options for creating a personal website. For this recipe, we will create a WordPress site hosted on Bluehost in six steps:
- Define your purpose
- Choose your domain
- Choose your platform
- Choose your host, buy hosting, buy your domain
- Set up WordPress on Bluehost
- Have a look around
There are many good chefs out there, and similar recipes can be found here and here. I encourage you to be well informed to get comfortable in your digital personal branding kitchen. Being informed removes fear and makes you comfortable, and being comfortable can help you let loose your creativity and enjoy the cooking process.
Preparation time: 1 hour
Cooking time: 1 hour
Ingredients:
- A purpose
- A URL / domain
- A credit card (to pay for hosting and your domain)
- $60 to $90 for hosting
- A blogging platform (WordPress)
- A host (Bluehost)
Step 1. Define your purpose
You always have a reason for cooking, such as preparing a romantic dinner, fixing a quick snack, or feeding your family.
In the same way, you should have a purpose for your personal branding efforts. Like paste in a curry, your purpose is the spice that pervades through the online dish of your personal brand. Without the spice, all you have is indistinct individual ingredients, random posts on assorted social platforms.
Your purpose is made up of who you are, where you are going, and a reason for the journey. Cooking up your purpose is a separate recipe we can talk about in detail at some later point. For now, we will be satisfied with being able to answer:
- How do I perceive myself now?
What is my current position? What are my strengths, weaknesses and known opportunities? How do I introduce myself to others? More importantly, when I look in the mirror, what do I say about myself? - How do I want to be perceived?
What position do I want in the future? Who do I want to be around and how do I want to be perceived by those people? - What is the gap and why do I want to change?
What do I need to change to get from where I am to where I want to be? What is motivating the change? Is that motivation enough to get me to move?
Examples of reasons people have shared with me for wanting an online expression include:
- Career development or career change
- Sharing what they learn in their academic efforts
- Position themselves as an expert in their industry
- Affecting social, political or industry change
- As a form of creative expression
- To capture their life reflections
Don’t stress on getting this perfect, as your purpose can mature and be refined over time. We will go into more detail about purpose when we cook up our first post. For now, be sure you can articulate a rough idea of why you are considering following this recipe.
Step 2. Choose your domain
Just as a restaurant is known by a name, your website has a domain. Your domain is your digital address, your URL, what people type in their browser to find you.
With your purpose in mind, decide whether you are positioning yourself as a person or as a separate identity. If you are positioning you in the market as yourself, you should secure the domain for your name. For example, a friend of mine has her leadership blog at www.kaliegladwin.com, a social activist I follow is at www.mattdarvas.com, the CEO of Domino’s Pizza can be found at www.donmeij.com and the managing director of a digital marketing company I work with is at www.llewjury.com.
If you are setting up a separate identity, you need to see if the domain that is available that best represents what you are doing. For example, my wife Theresa’s site is www.flavoryellow.com/blog/ based on having a different flavor in life and I used www.sidewaysthoughts.com based on wanting to challenge myself to think about things from a different perspective. I share here about moving from www.renando.com. Other reasons including being known for what you do rather than who you are, allowing others to guest post under the brand, and maintaining separation from your personal or professional identity and the opinions you share.
You can generally check to see if your domain is available at the same place you purchase your domain, which is often the same place you get hosting. Domains on their own cost around $10 per year, although many hosting companies throw in the purchase of your domain in the hosting package costs. We will cover this shortly.
3. Choose your platform
Your platform is your kitchen, where you will create your digital masterpieces. The platform is the software of your site or blog. I list a few well known ones in my annual social media review here.
I have tried Blogger, Tumblr, and WordPress, and I talk about my reasons for recommending WordPress here. A more detailed review by someone else is here, another comparison of Blogger and WordPress is here, a great table for WordPress, Tumblr, and Blogger is here, and another prolific blogger, Hunter Walk, talks about his reasoning here. WordPress is fairly easy to use, the SEO is excellent out of the box, the support from a broad community is excellent. As this recipe is for a self-hosted WordPress blog, we’ll stick with that.
4. Choose your host, buy hosting, buy your domain
Your host is where your platform lives and the place where you point your domain. You have a few options with WordPress:
- Option 1: Host with WordPress on a WordPress domain (e.g., http://chadrenando.wordpress.com/)
- Option 2: Host with WordPress and use your custom domain, as explained here.
- Option 3: Host with an external host. I highly recommend Bluehost, as they are reasonably priced, I have found the support to be exceptional, and they are listed on the WordPress page for hosting.
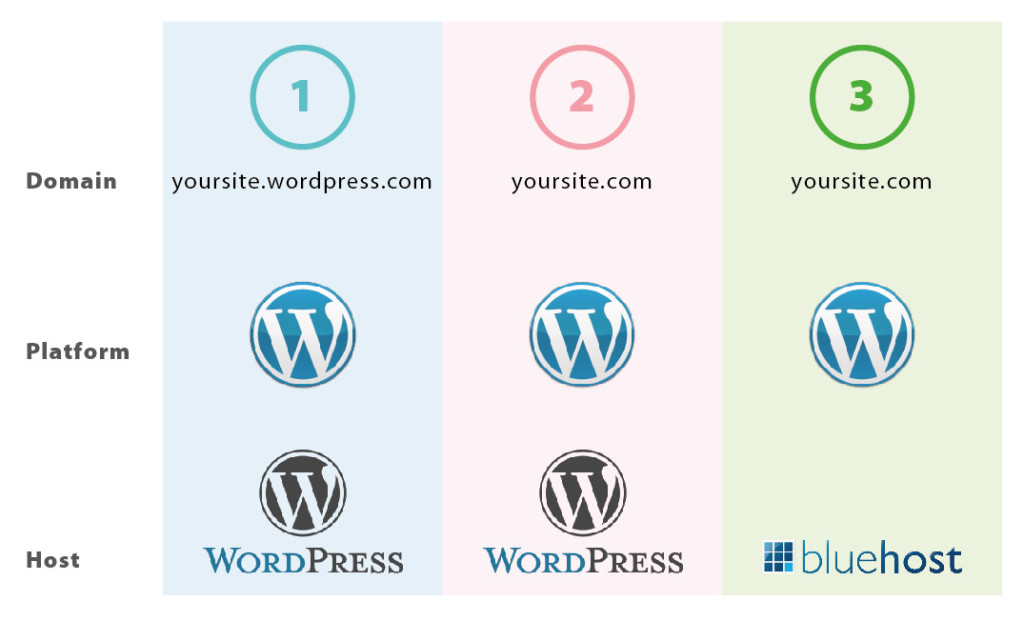
Most people I speak with are setting up an entity or identity. Option one does not appropriately position them in the market. Option two allows you to blog without having to worry about your own host or managing things likes updates or security or having to pay for your own hosting arrangement. Option two also allows you to be found within the WordPress blogger network.
However, option two also has limitations in terms of plugins and themes you can use (we will get to those). There is a good comparison between fully-hosted and self-hosted here and a great infograph on the options here.
I share the opinion of the infograph folks in recommending option three, as it allows you to do more with regards to plug ins and future flexibility. Some people start out using option two and then migrate to option three with their own host. If you are thinking about migrating at some point, I recommend moving sooner rather than later. The WordPress platform allows you to export and import your content, but you run the risk of losing social numbers on your posts when you move.
When looking for a host, you will want to go with someone who has some sort of live-chat support, who is affordable, who specialised in WordPress to understand the security requirements, and is well respected in the market. After hosting with an inexpensive smaller company for several years and suffering downtime and poor service, I switched to Bluehost and have been satisfied so far. Example costs for Bluehost are around $84 per year for a one-year plan and around $60 per year for a three-year plan.
Buying your domain and hosting on Bluehost is straight forward. Click on the big button on their home page, select whether you are creating a domain and already have a domain, and fill in the single form. You do not need any additional add-ons at this point. Enter your credit card details to be the proud owner of your very own rented Internet real estate.
5. Set up WordPress on Bluehost
We now know what your site is going to be called (your domain) and where it is going to live (your host). We are also going to assume you will use WordPress. We are ready to start mixing these ingredients together.
After you buy your host and domain, you will be sent an email with login details. You get two sets of login details: 1) FTP details to your server where your site will live; and 2) your control panel username and password to manage certain aspects of your space on your server and your domain (so long as you bought it through your host).
We will not need FTP details for this recipe. They allow you to manually move files from your computer to the server using free software like FileZilla. You can also do this through your control panel, although it can be a bit clunky. Don’t worry about this for now.
Bluehost in their control panel offers a one-click installation process for WordPress. At the time of this writing, they used a third-party solution Mojo Marketplace that has an easy step-by-step process to walk you through the set up. Click on the WordPress icon in the Bluehost control panel. The process will take you out of your Bluehost control panel environment and into the Mojo Marketplace website.
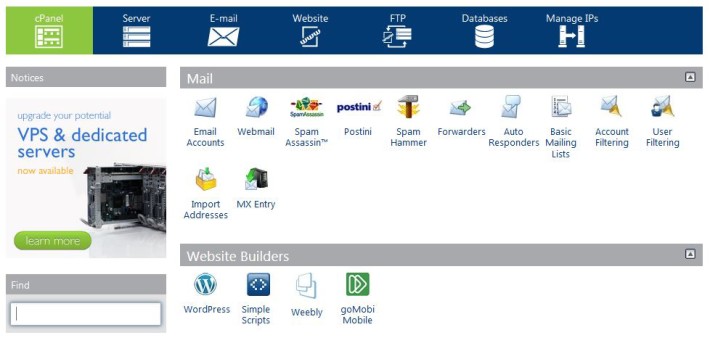
Follow the prompts to walk you through the installation process. Click start, select your domain, and create your blog. When it asks, click on Show Advanced Options and note the admin user name (should be your email address) and the password. If this is a clean installation, ensure the option for automatically creating a new database is ticked.
After a few moments in the proverbial oven, your WordPress website will now exist on your very own host. Well done!
6. Have a look around
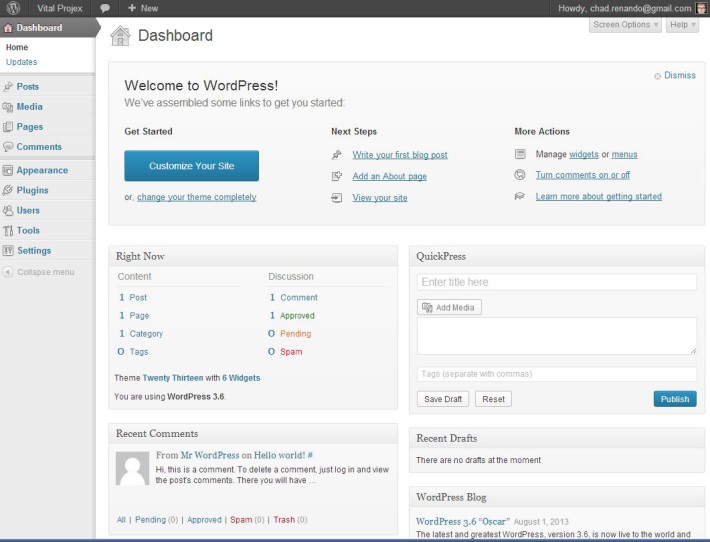
WordPress applies a default theme when it is first set up. I went through the steps myself for a not-for-profit I am involved in as part of writing this blog and was presented with the results below without making any changes myself:
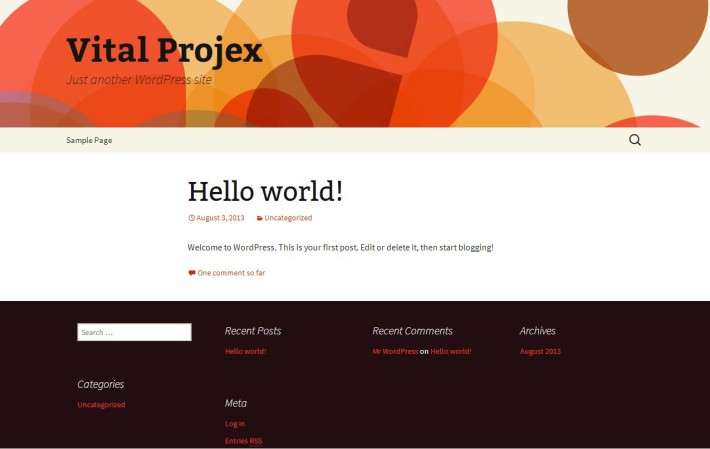
You make changes in WordPress through what they call the administration, or admin. For a WordPress site, you log into the admin by going to www.yoursite.com/wp-admin/ (and change yoursite to either the domain you purchased or the temporary URL your hosting provider gave you). When I did it, I had to use the forgotten password function as the first password did not seem to take. Given that everyone knows how to access your admin, ensure you use a strong password. A good guide for creating passwords can be found here.
Once you log in, you will be presented with a dashboard to manage your site. Your main navigation areas are to the left. Feel free to “Dismiss” the welcome message. You can get it back if you want by clicking on Screen Options in the upper right next to your log in name.
Like a chef tasting the mixture before it is cooked, feel free to have a click around to get comfortable with your admin. Your website is not yet fit for serving, but you can play. The nice thing about creating a new site is no one knows it exists. Even if you feel you completely break something, you can always start over by repeating the one-click installation process.
In our next recipe, we will choose and apply a theme and configure plugins for our new site.
Most chefs like to know how people enjoyed their meal. If you feel others may find this recipe useful or tasty, please share on the social channels below. I welcome your questions if you are doing this recipe yourself, and any insights, comments or changes you think are necessary if you have done this in the past. I will update this when I become aware of things changing and if some steps need to be clarified.
Finally, feel free to subscribe in the upper right to be notified of future recipes as they are posted.
All posts in the online personal brand recipe book can be found here.
Love your recipes Chad. They are easier to follow than food-related ones…and – for culinary-challenged folk such as I – much less mess and more fun to make 🙂 .
Thanks Kalie! Yes, these can be much cleaner. In my kitchen efforts, I can’t count the number of times I have wanted to “undo” that extra tablespoon or “copy and paste” a repeated 10 minutes of stirring over a slow burner. A website will not replace a good meal, but your comments show they can still get good friends around a table. 🙂