

An online personal brand recipe book: Setting up your WordPress site, themes, and plugins
I need to set the scene before we get to our next recipe. People grow through relationships and relationships are defined by our conversations. I have many exciting conversations with people who want to make a difference in this world, who have something to say, or want to express themselves in a meaningful way. These conversations are full of intent and subtleties that cannot be conveyed through emails or blog posts.
At some point in the conversation, we may both agree that perhaps a blog may be an effective way for the other person to achieve their outcomes. This is where things get technical and somewhat routine. There is a shift where conversations move from a rich interaction to a step-by-step advice. I am writing this series as a place to point people to for advice; not to replace conversations, but as a resource to point people towards after the conversation.
With that in mind, I invite you to enjoy the next recipe on setting up your WordPress site that we created in our last recipe. This is the most technical of the recipes, but everything can be done by clicking around and giving it a try. With a conversation in your mind about where you are going and what you want to achieve, I invite you to step into the kitchen.
Preparation time: 1 hour
Cooking time: 2 hours
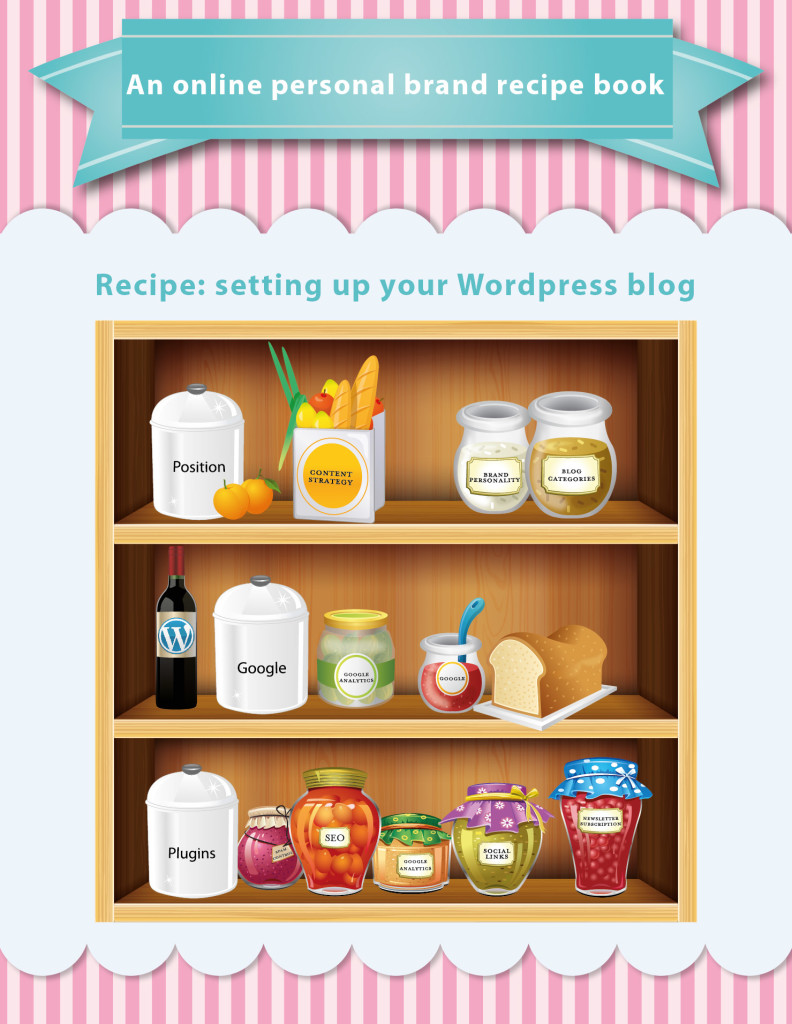
Ingredients:
- Your brand personality
- Content strategy
- Blog categories
- A WordPress theme
- A credit card or PayPal account with $40 to $80 (optional for a paid theme)
- A gmail address
- A Google Analytics account
- A Twitter account (optional)
- WordPress Plugins (Spam control, SEO, Google Analytics, Social links, Twitter feed, Newsletter subscription)
Step 1: Understand your brand personality
Each of us has a distinct flavor. Every time we have an interaction with other people, whether it is through email, a personal conversation, or some comment we make online, we leave behind a taste of who we are. In the same way, your brand personality will determine the look and feel of your site.
How do you want to be perceived? Are you care-free and fun or professional and serious? Are you energetic and lively or calm and classical?
Determine which aspects of your personality you want to highlight. We all strike a balance between being authentic and presenting ourselves in a way that we feel is best for the situation. Have a look around at other blogs of people you feel have a similar purpose as your own. What do you feel their blogs say about their personality?
Step 2: Consider your content strategy
Recipes typically don’t have just “spice” as an ingredient. Spice varies by type, amount, and flavor. Adding a dash of cumin will create a different experience than adding a tablespoon of chili, and within the chili family there are different strengths and tastes.
In the same way, your site will have more than just “content”. Content comes in all shapes and sizes. Aspects to consider include:
- Type
Will you be using video and images or just words? I recommend at least one featured image with each post due to the higher engagement rates with imagery. Stats such as 94% more views for posts with images can be found in an infograph here. - Word count
Will you be capturing pithy quotes, two or three paragraph statements, or three-page epics? This really depends on your audience. Sites like Mashable tend to have word counts in the hundreds for quick digestion while blogs on business sites tend to be more word-weighty. My own posts range from 1,000 to 2,000 words.What is best is whatever you are comfortable with that gets your point across. Heidi talks about points to consider here, Andrew notes an average word count of 1,278 for successful blogs, Neil shows here how longer posts of around 1,292 are good for SEO, Copypressed cites an average 2,416 word count for top ranked searches, and Corey says focusing on word count is just stupid. - Frequency
Will you be posting daily, weekly, monthly, or less? This will largely depend on how much time you have and how many posts you feel are necessary to achieve your purpose. My target is weekly but it can be as few as two a month or as many as two a week. Each post can take me 4 to 8 hours, but I spend a fair amount of time researching. Heidi’s Hubspot graph shows engagement with new readers increases only marginally after weekly posts until you get to multiple times per day which is too much for most people with a life.
How much content you think you might write is likely to change once you get into it. Like much of life, there is often a difference between what you intend to do, what you should do, and what you will do. We will talk about finding images, a word count and a schedule right for you and your objectives in the recipe for creating your first post.
Step 3. Define your categories and structure
WordPress has two concepts you need to be aware of: tags and categories. Tags are common words that link posts together and are added after you write your post. For example, tags for this post will include ‘Wordpress’, ‘Blogging’, ‘Social media’, and ‘An online personal brand recipe book‘.
Categories on the other hand are broad concepts in which all your posts fit under. A blog post typically sits in a single category, two at most. You can see the categories I use as the navigation for the site:

For example, I have categories of ‘This digital life’ and ‘Realising potential’. There is some cross over when I post about finding meaning within digital expression, but generally the focus is distinct.
Write down the broad categories you feel your posts will fall in, and note what you are trying to achieve with each category. This will help you know when you are getting off topic when your post does not align with a category. It will also help you see when your focus shift if you don’t post in a category for some time.
Like your purpose, don’t feel you need to get this 100% on the first try. Blogging is a process of learning. At some point, you may reflect on your posts and re-define your categories. I talk about going through this process here.
Step 4: Pick and install your theme
You are now armed with an idea about the personality you want to portray, the type of content you plan on publishing, and categories your posts will fall in. It is now time to pick your theme.
There are many free themes available for WordPress, and you may want to stick with the default theme or a free theme as you start out. Just go to Appearance and select Themes in the left navigation. Then select Install Themes and browse.
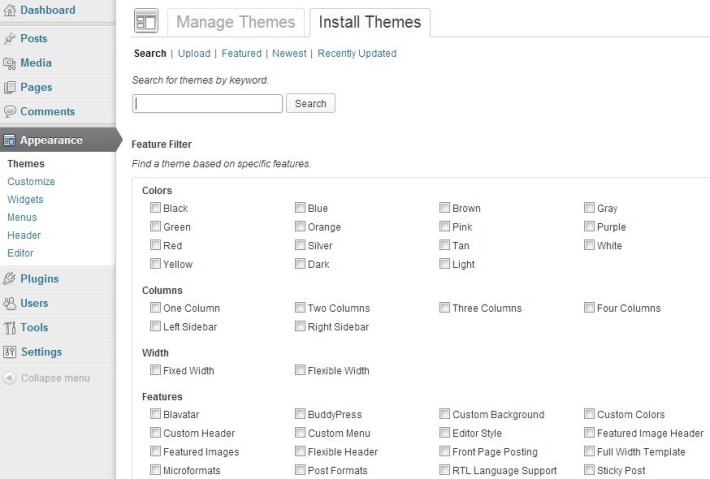
If none of the free themes do the trick, then sites like Theme Forest have a good selection and an active review and support system. The cost of a theme is generally between $40 to $80 and I have found it to be well worth the investment.
Expect to spend some time browsing the options, as there are several to choose from and many can appear similar. You are looking for a theme that you feel reflects who you are and can present the type and amount of content you believe you will produce.
A few other criteria to consider:
- Responsive
Ensure it is responsive, meaning it works well on mobile and tablet devices as well as desktop. You can test this by shrinking your browser horizontally and seeing if it looks good at a reduce width. - Structure
Ensure it can handle your structure, meaning it works well to display pages as well as blog posts or just blog posts, depending on what you decide. - Support
Ensure it is up to date and there is support. A great aspect of Theme Forest is that reviews and support are available for each theme. If there are a lot of negative reviews or support questions do not get answered, you may encounter issues. - Representation
View the preview and look at the home page, page content , and a blog post page. Imagine your content on that page. Can you see yourself represented through this theme?
This is one of the most challenging parts of the recipe. Take your time and give yourself permission to be uncertain. I talk here about the process we went through for Theresa’s site Flavor Yellow.
If you are having trouble deciding between a couple of options, keep in mind that either option will likely serve you well. You can also easily apply a new theme to your site after you have been posting for a while if this one does not work.
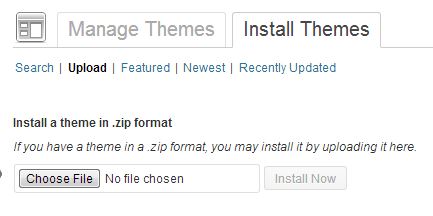
Once you decide on a theme, it is easy to install. If you are using one of the free themes, you just need to click on the “Install” link next to the theme name and, once installed, click Activate.
If you purchased and downloaded a theme, you will need to:
- Go to Appearance and Themes in the left navigation
- Click on Install Themes
- Click on Choose File and select the .zip file that contins the Theme you purchased
- Click Install Now
- Click Activate
Step 5. Basic site setup
There are a few settings you will want to update under the settings section.
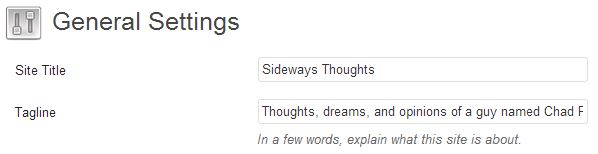
- General
Update your site title and tagline to something appropriate. How this will appear will depend on your theme. Most other general settings you should be able to keep as default.
- Discussion
The options are fairly self-explanatory. To control spam, the important ones to get right are the ones about “Before a comment appears”.

- Media
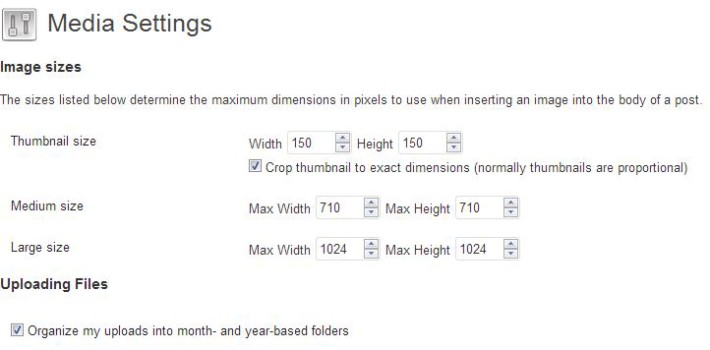
Media will depend on your theme, as your theme will likely prefer certain sized images for feature images and post images. This is important in that WordPress will automatically create images of the sizes you specify. As an example for Sideways Thoughts, I set the large default width to match the reading area of 710 px and the thumbnail width to 150 px. Both sizes were specified by the theme.
- Permalinks
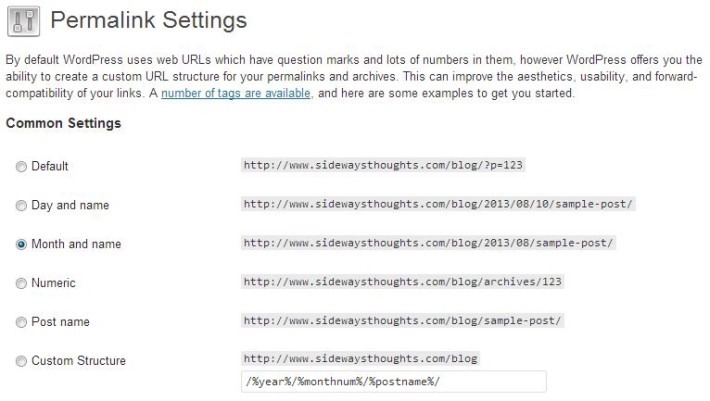
This is an important one to get right from the beginning. I store my posts as month and name so I can easily recall when I published a post. Some people recommend just having the post name so you cannot immediately tell how old a post is when looking at it from Google. Either way, don’t use default, as ?p=123 is not a very compelling link.
Step 6: Set up Google Analytics
You blog is like a buffet you are serving to hundreds of strangers. Google Analytics tells you how many people are eating, which dish they are eating, and how often they come back for seconds.
Setting up Google Analytics is easy. If you don’t have a Gmail address, get one at https://accounts.google.com/. Once you have your Gmail address, log into Google Analytics with your Gmail user name and password and set up a Google Analytics account at https://www.google.com/analytics/.
Once you create your Google Analytics account, you will be provided with a number that looks something like this: UA-10293518-1. Google moves things around occasionally. If you need to get your number again in the future, you can find it under Admin (upper right button) and under “Tracking Info” under the Property section.

We will cover using Google Analytics to analyse your blog traffic in another recipe.
Step 7: Install and configure your plugins
One of the great aspects about WordPress is its ability to add functionality through what it calls plugins and widgets. I have found the plugins below to be effective and will update this recipe from time to time based on my own experience and feedback I receive from others.
Some points to note:
- Versions
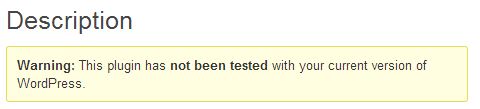
Ensure each plugin works with your current version of WordPress. Plugins may not work if they are not verified with your current version of WordPress.
- Plugin updates and Security
Be sure to keep your plugins updated. If you are not using plugins, delete them from your admin. I have known people who have had vulnerabilities in old versions of plugins exploited and their site hacked.

- Plugin settings
The settings for plugins are changed in a few areas from the left-hand navigation. These include under the settings area, as a separate link below the navigation, and in the widgets area, which we talk about below. You do not need to click on the Edit link for the plugin, as that allows you to change the code behind the plugin, which most people do not need to worry about. - Widgets
Some plugins work behind the scenes on things like spam control and SEO. Others are applied to the interface en mass, like many social plugins. There are other plugins like Twitter feeds and newsletter subscriptions that use “widgets” to determine where on the site they are applied. Once the plugin is activated, a widget is available under the Appearance section of the admin. To apply the widget, drag, drop and customize it into the area you want.For example, in my widgets area I can drag widgets into the sidebar and they will automatically appear on my site. I can then further configure each widget by clicking the widget heading.
Some recommended plugins are below. To find plugins, just search for the names under Plugins / Add new.
- Spam control plugin: Akismet
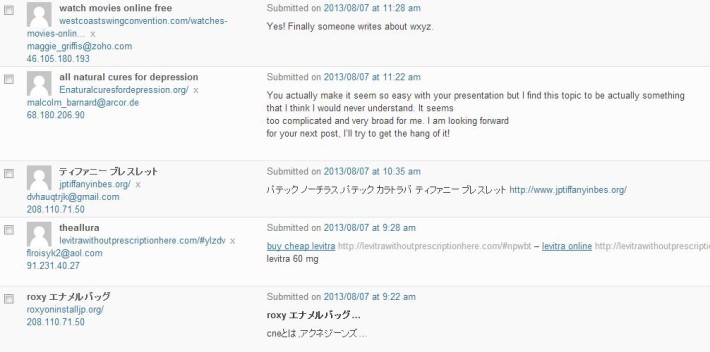
WordPress blogs are prone to having automatic bots spam the site in the hopes that you approve the comments and increase links back to their sites. Some examples of typical spam are below. Do not be fooled when you see posts saying things like “I value the article. Really looking forward to read more.” Unless they mention something that makes you think they read the article, they are usually bots. If you give them permission once, they can then post comments without being filtered.
Akismet reduced my spam count from hundreds per week to one or two per month and they say they stop over 13 million spams a day. You will want to activate Akismet and get an API key. The process has a few steps more than the usual plugin. When you activate the plugin, you will see a banner asking you to activate your account.

You will then be asked to get an API key.

Clicking on the option to create a new key will take you to the Akismet site for the rest of the process. - Search Engine Optimisation (SEO) plugin: All in One SEO Pack
I use the All in One SEO Pack. Other people talk about how to set it up here. You will need to add your Google Analytics tracking code in the settings. - Google Analytics plugin: Google Analyticator
I use the Google Analyticator plugin. Add your Google Analytics code and be sure to adjust the settings so it does not track your traffic if you are logged in. - Social links plugin: Page/Post Specific Social Share Buttons and Digg Digg
You will likely want a plugin that allows people to share your posts on various social channels. I use both Page/Post Specific Social Share Buttons based on wanting the links at the bottom of each post for both desktop and mobile views and Digg Digg which shows a floating strip that is always on the screen. - Twitter feed plugin: Really Simple Twitter Feed Widget
If you are on Twitter, showing your Twitter stream can add some currency to the page and drive people to your Twitter stream if they are so inclined. I use the Really Simple Twitter Feed Widget, which is exactly what its name implies. - Newsletter subscription plugin: Subscribe2
Subscribe2 allows you to add a subscription feature to let people sign up to get emailed when you release a post. - Tag cloud: Configurable tag cloud
There is debate on the value of a tag cloud, and many are critical of the feature. Personally I find it a useful navigation tool give the number of posts I have on different topics. However, not many people use it according to my Google Analytics traffic. If you use it, you should limit the number of tags shown due to concerns about impacts on SEO if your tag cloud gets too big. I set mine to show tags only when there are three or more posts that have the tag.
Serve and enjoy
You should now have a themed blog or website and a few configurations in place. You should also be comfortable enough to click around and play with a few other settings. Gaze upon your work and enjoy the meal! We will cook up your first blog post in our next recipe and talk a bit about how you get the word out about what you are doing.
If you have followed the recipe, I would love to see your creation! Drop me a note in the comments below to “show and tell” or if you have any questions. If you feel others would benefit from the recipe, please share on the social channel of choice.
Finally, a blog post that tells me how to set up a blog. thanks! 😉